Search This Blog

Friday, March 4, 2016

OSD Menu for CCD FPV Cameras

From Banggood Forums:
Bang Good CCD camera SKU224879 OSD Menu Setup

NOTE: Many Bang Good CCD cameras have built in OSD (On Screen Menus) that enable users to set many powerful parameters on the cameras, but these OSD menus require a separately purchased OSD board (SKU239628), and the menus can be very difficult to navigate if your native language is not Chinese, since menus are initially provided in Chinese characters!

This blog provides English translations of the OSD menu for one CCD camera (SKU224879) and instructs how to set the menu language to the owner's native tongue.

To save your settings and especially the OSD menu in your own language, scroll down to the 7th menu item (Camera Set), press your MENU or Enter button to go to the Camera Set menu, scroll down again to the 5th option (Language), and press the R=Right or L=Left button to select your language. Then scroll down to the last (RET) option, click the Enter button, and scroll down to the last (9th) option (EXIT) and click the Enter button again to save your changes to the board. Now the next time you power up the board, this language and the other new settings will be used.

Hope you find this helpful. -VirginiaJim

MAIN MENU
A. Lens: ELC
B. White Bal: ATW toggles through-> PUSH,LOCK,MANUAL,ANTI,ATW
C. Day/Night: AUTO -> COLOR,BW,EXT,AUTO
D. Backlight: OFF ->BLC,HLC,DWDR,OFF
E. Functions:
F. Pict Adj
G. Camera Set
H. Initial
I.  Exit:    Save

A. LENS Menu
1 Shutter: Auto
2 Bright D (daylight):  50
3 Bright N (night):  50
4 LSC: OFF
5 Ret (Return)

E. FUNCTIONS Menu
1 DNR: 6
2 AGC GAIN: HIGH ->OFF,LOW,MID,HIGH
3 MIRROR:  OFF -> ON,OFF
4 MOTION: OFF -> ON,OFF
5 PRIVACY:   -> PRIVACY MENU
6 BPC:  -> BPC MENU
7 DEFOG:  OFF ->ON, OFF
7 RET (return)

5 PRIVACY Menu
Area: 1
Mode: OFF ->ON,OFF
COLOR: 1
LEFT: 13
RIGHT:26
TOP:21
BOTTOM:39
RET (return)

6 BPC Menu
TH: 40
?
RET (return)

F. PICT ADJ Menu
1 SHARPNESS: 50
2 BRIGHT: 50
3 CONTRAST: 50
4 COLOR: 50
5 HUE: 50
6 WB RED: 50
7 WB BLUE: 50
8 Y-GAMMA: 50
9 C-GAMMA: 50
10 RET (return)

G. CAMERA SET Menu
1 CAM ID: 1
2 CAM TITLE:  CAM TITLE MENU
3 PROTOCOL: PELCO-C -> PELCO-P,PELCO-D,PELCO-C
4 BAUD RATE: ----- ->
5 LANGUAGE:   ??? -> ENG,CH script, CH script, ESP,PORTUGUES,
6 RET (return)

H. INITIAL MAIN Menu
1  Chinese? characters (script)
2 script
3 script
4 script
5 script
6 script
7 script (CAMERA SET -> 5=LANGUAGE -> ENG
8 script
9 script


Thursday, March 3, 2016

Buzzer Solutions for CC3D, CleanFlight, SBUS

Basically there are 2 methods for buzzer control: Connecting to receiver outputs or connecting to flight controller. First method provides only basic functionality like control by a switch or activation by loss of radio connection. Second method provides additional functionality like signaling on arm/disarm, low voltage, flight modes, etc.

This is a list of different methods gathered from several forum posts. I've only verified method 4 working.

1 - Connect Buzzer to Receiver Servo Output
On CPPM mode, receiver channel outputs 7 & 8 are for PWM servo output.
- Connect this buzzer between a servo output channel and a servo like an extension wire.
http://www.myrcmart.com/rc-lost-model-alarm-findertracker-for-planegliderhelicopter-p-3145.html
- When there is no stick movement for 1 minute on Ele or Ail sticks, buzzer starts beeping

2 - Solder buzzer to CC3D STM32 pin
- Solder the circuit below to pin 15 of STM32 chip on CC3D board


- Setup buzzer configuration in CleanFlight configurator

3 - Use a Buzzer Enabled BetaFlight deployment
Possible BetaFlight versions: 2.1.6
Download: https://github.com/borisbstyle/betaflight/releases/tag/v2.1.6
- With this version, connect buzzer to Pin6 of CC3D output channels (motor output pins). See diagram below.
- Setup buzzer configuration in CleanFlight configurator

Active buzzer alarm modules already includes the transistor circuit above. In this case connect buzzer signal pin to motor output 6 signal pin. Connect +5v and gnd pins to a +5v source on the board. You can use any free channel output as +5v source also.


4 - Enable Buzzer on BetaFlight CLI
Possible in BetaFlight versions after 2.1.6
Hardware Notes:
- I can confirm that Discovery Buzzer from HobbyKing works: http://www.hobbyking.com/hobbyking/store/__14521__HobbyKing_174_Discovery_Buzzer.html
- I could not manage to make this active buzzer working with this method:
http://www.ebay.com/itm/221686970259

Setup:
- Connect buzzer to Pin6 of CC3D output channels (motor output pins) . See diagram above.
- CLI Command: set enable_buzzer_p6 = ON
- Setup buzzer configuration in CleanFlight configurator
     - Add Beeper mode in Modes tab. Assign an AUX switch as set in transmitter configuration.
     - Use CLI command beeper to adjust CC3D control.
            beeper -all disables all options
            beeper all enables all options
            Specific options:
# beeper
 beeper GYRO_CALIBRATED
 beeper RX_LOST
 beeper RX_LOST_LANDING
 beeper DISARMING
 beeper ARMING
 beeper ARMING_GPS_FIX
 beeper BAT_CRIT_LOW
 beeper BAT_LOW
 beeper GPS_STATUS
 beeper RX_SET                 ;enable buzzer control through a transmitter switch
 beeper ACC_CALIBRATION
 beeper ACC_CALIBRATION_FAIL
 beeper READY_BEEP
 beeper MULTI_BEEPS
 beeper DISARM_REPEAT
 beeper ARMED
 beeper SYSTEM_INIT
 beeper ON_USB
This is the configuration I'm using:
beeper -ALL
beeper RX_LOST
beeper ARMED
beeper BAT_LOW
beeper RX_SET
save


5 - Move SBUS channels on Receiver
For Frsky PWM receivers like X4R-SB.
This method connects buzzer to the receiver. CC3D buzzer setup is not used.
Note: X4R-SB firmware must be updated to CPPM version from:
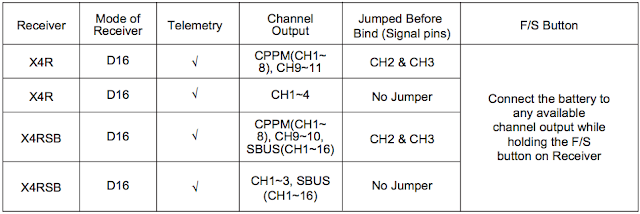
- Bind receiver to enable SBUS and 10 channel setup. This mode can be set by connecting group 2 and group 3 pins with a jumper while powering the receiver
- On Taranis, create an input switch to control buzzer and assign to channel 9 
- Connect buzzer cable to group 2 pins (+, - and signal) on receiver
- Check that there are enough AUX channels allowed in BetaFlight (v2.4.1 RC2 and newer). CLI command to set number of AUX channels is:
    set max_aux_channels = xx
- On CleanFlight configurator, check that AUX9 is controlled by the buzzer switch assigned on Taranis. CC3D must be on Serial / SBUS mode.

6 - Move AUX channels on CC3D
This method connects buzzer to the receiver. CC3D buzzer setup is not used.
- Connect buzzer cable to group 1,2 or 3 pins (+, - and signal) on receiver
- On Taranis, create an input switch to control buzzer and assign to Channel corresponding to the group pins selected (Channel 1,2 or 3)
- Check that there are enough AUX channels allowed in BetaFlight (v2.4.1 RC2 and newer). CLI command to set number of AUX channels is:
    set max_aux_channels = xx
- On CleanFlight configurator, change receiver channel setup from TAER1234 to 1234TAER. This will free channels 1-4 for AUX switches. Issue the following command on CLI tab:
           remap 1234TAER
- On CleanFlight configurator, check that corresponding AUX channel is controlled by the buzzer switch assigned on Taranis. CC3D must be on Serial / SBUS mode.

References
- CleanFlight buzzer setup documentation:
https://github.com/cleanflight/cleanflight/blob/master/docs/Buzzer.md


Wednesday, February 3, 2016

Firmware Upgrade for Sport Devices Using FrSky Taranis

1 - Copy Firmware files to Taranis

1 - Put Taranis into Bootloader mode
     - Power off
     - Power on while pressing both trims inward

Pressing trims inward while powering
2 - Connect Taranis to PC / Mac using USB cable.
    New drives (like E: and F:) will appear in file system

3 - Create a new folder on root of E: named FIRMWARE
4 - Copy all firmware (*.frk) files into this directory
    Download site for FrSky devices: http://www.frsky-rc.com/download/
5 - Disconnect Taranis and power off

2 - Connect S.Port Device to Taranis

Taranis Pinout (From top to Bottom):
PPM PPM/PXX/DSM Output
HEARTBEAT Sbus / CPPM Output
BATT Switched Battery Voltage red
GND Ground black
SPORT Telemetry Output orange

Connect to SPORT device using standard servo cable
BATT - VCC
GND - Ground
SPORT - Signal

3 - Download Firmware to Device
1 - Power on Taranis normally
2 - Navigate to Radio Setup page by long pressing Menu button
3 - Navigate to SD Card menu by Page button
4 - Navigate to newly created FIRMWARE folder by +- buttons, ENT to enter
5 - Select the correct firmware file for the connected device by ENT button
6 - Select Flash External Device from menu
7 - Wait till download is competed and disconnect device.


Monday, December 21, 2015

CC3D SBus CleanFlight FrSky Taranis X8R / X4RSB Setup


CC3D Connection
- Connect SBus cable to Main Port on CC3D ans SBus port on X8R

Main Port is next to the Mini USB port on CC3D.


Image result for cc3d sbus cable image
Main Port SBus Cable


Pin #3 (green or blue cable) is not used. Pin #4 (orange or yellow cable) is signal cable for SBus


X4RSB Connection
SBus port is composed of 3 pins in group 4 above. Group 4 pins are on the lower and bottom side of the diagram above.

SBus cable conenction mapping:
Black (GND) Pin-
Red (Power)  Pin+
Orange/Yellow (Signal) PinS


X8R Connection

SBus port is composed of 3 pins on lower far side of the image above.
SBus cable conenction mapping:
Black (GND) Pin-
Red (Power)  Pin+
Orange/Yellow (Signal) PinS


Taranis - X8R / X4RSB Setup
- Check that Taranis binding mode supports SBus
Taranis must be in D16 mode

- Check that Receiver binding mode supports matches Taranis
Refer to http://multicopter-howto.blogspot.com/2015/12/receiver-binding-options.htm


- Default channel order in Taranis is ok for CC3D / CleanFlight setup
CH1 – THR
CH2 – AIL
CH3 – ELE
CH4 – RUD


CleanFlight SBus Setup

1- On Ports Page, SBus port must be selected on UART1
- UART1 / Data(MSP) setting should be OFF
- UART1 / RX(Serial Rx) setting should be on.
Save and reboot CC3D


2- On Configuration page, SBus must be selected:
- Receiver Mode should be RX_SERIAL
- Serial Receiver Provider should be SBUS
Save and reboot CC3D


3 - On Receiver page, check that channel map is matching with Taranis channel order setup. Default order TAER is ok.


References

Open Pilot Revolution FC Guide
http://www.dronetrest.com/t/openpilot-revolution-flight-controller-guide/1361

CC3D, Betaflight, X4R sbus connection video
https://www.youtube.com/watch?v=MRbWZXGtDNY


Flight Controller Comparison Table


FC NAZE 32 FULL 10 DOF REV 5 NAZE 32 ACRO 6 DOF REV5 MINI FLIP 32+ 10DOF FLIP32+ Seriously Dodo
Processor STM32F103CB STM32F103CB STM32F103CBT6 STM32F103CB STM32F303
Size 36x36 36x36 33x16.5 36x36 36x36
Gyro MPU6050 MPU6050 MPU6050 MPU6050 MPU6050
Accelerometer MPU6050 MPU6050 MPU6050 MPU6050 MPU6050
Magnetometer HMC5883L No No HMC5883L No
Barometer No No Yes No Yes
Pressure Sensor MS5611 No No MS5611 No
Hex Support Yes Yes No Yes Yes
Gimbal Support Yes Yes No Yes ?
Receivers PWM, PPM, Spectrum PWM, PPM, Spectrum PPM, Spectrum PWM, PPM, Spectrum PWM, PPM, Spectrum, Sbus
Inverter Yes Yes No Yes No
Battery Monitoring Yes Yes No Yes Yes
Memory 16 Mbit 16 Mbit No 16 Mbit 16 Mbit
Price 30 25 50
5v Regulator

Friday, December 18, 2015

Receiver Binding Options

FrSky X8R

After everything is setup execute these steps
1) Press [bind] in the Taranis menu
2) press and hold down the F/S button on the X8R (skip for Mode1)
3) power-on the X8R by plugging in a single servo cable from the powered model, e.g. the S.BUS cable
4) wait for the Taranis to beep. (~1second) and your RX is blinking red. This confirms a successful bind.
5) power off the rx
6) remove the jumpers, they are only needed for binding


FrSky X4R / X4RSB


Thursday, November 12, 2015

Eachine Racer 250 Settings (PID, Transmitter, etc.)


PIDS

1 - From AKCobra https://www.youtube.com/watch?v=41du7gPHzkA
For OpenPilot GCS


2 - From FryeSG http://www.rcgroups.com/forums/showpost.php?p=33391780&postcount=3823

For CleanFlight / BetaFlight 2.1.3 with LuxFloat
3s 1500mAH battery, 5045 props with camera on top
       P    I      D
Roll   1.4  0.025  20
Pitch  1.2  0.025  20
Yaw    4.0  0.040  10
---------------------------
set dterm_cut_hz=31
set deadband=4
set yaw_deadband=4
set blackbox_device=SPIFLASH
set rc_smoothing=ON
set gyro_soft_lpf=ON
set gyro_lpf=188HZ


FPV Transmitter Channels

12345678
A58655845582558055785576457455725
B57335752577157905809582858475866
C57055685566556455885590559255945
D57405760578058005820584058605880

CC3D / Receiver Channel Map

Channel Map: TAER1234
Receiver Connections:
Receiver Pinouts for 8 Channel PWM